Orinj version 7.0.0
Each track in the multitrack session view is equipped with a track control panel. The panel resides to the left of the track and allows various operations on the track. The following is the track control panel.
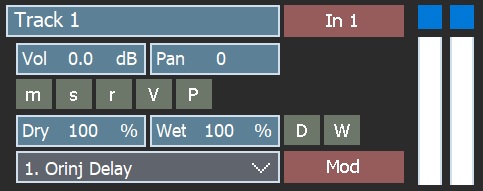
Track title
The track title is at the top of the track control panel (e.g., "Track 1" in the picture above). To change the track title, type a new one here. The track titles help you to organize your session, as newly recorded waves in each track will initially carry the title of the track. For example, if you name a track "Bass" and you record a wave in this track, the wave will be called "Bass_1.wav" or "Bass_2.wav" and so on depending on how many wave files you have already recorded in this track. You can always rename these wave files later.
Volume controls
The volume control ( ) allows you to change the volume of the track in the session mix. You can type a new volume value, use the up and down arrow keys to increase or decrease the volume, or press ENTER or double-click with the mouse in the control to call the volume dialog shown here.
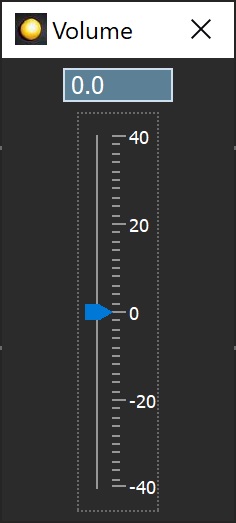
Change the volume in the dialog and close the dialog when you are done. You can also press ENTER to close the dialog. You can use both the text box and the slider of the dialog. These two controls work together and the value of one will change when you work with the other. It is typically easier to use the slider for larger changes and the text box for more precise settings.
(Tip: You can also click on Track and then on Volume in the multitrack session menu to change the volume of the current track.)
Pan controls
Use the pan control ( ) to change the track's pan. You can type a new pan value, use the up and down arrow keys to move the pan right and left respectively, or press ENTER or double-click with the mouse in the control to call the pan dialog shown here.
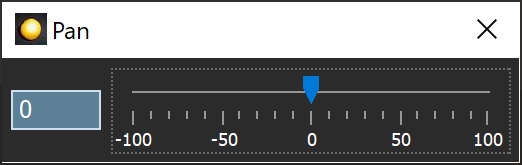
Use the dialog to change the pan and close it when you are done. Pressing ENTER in the dialog also closes it. As with the volume dialog above, the text box and slider of the pan dialog work together.
(Tip: You can also click on Track and then on Pan in the multitrack session menu to change the pan of the current track.)
A negative pan number means panning to the left. A positive pan number means panning to the right. A pan of negative 100 is left channel only and a pan of positive 100 is right channel only. A pan of positive 25 means that a gain in the right channel of 1.25 (4.5 dB) and a gain in the left channel of 0.75 (-5.75 dB). All sound processing in Orinj is stereo. Mono sound is converted to stereo sound during mixing and playback.
Input device button
The input device is the device from which the track gets sound when recording. If you click on the track input device button ( ), you will see the following dialog.
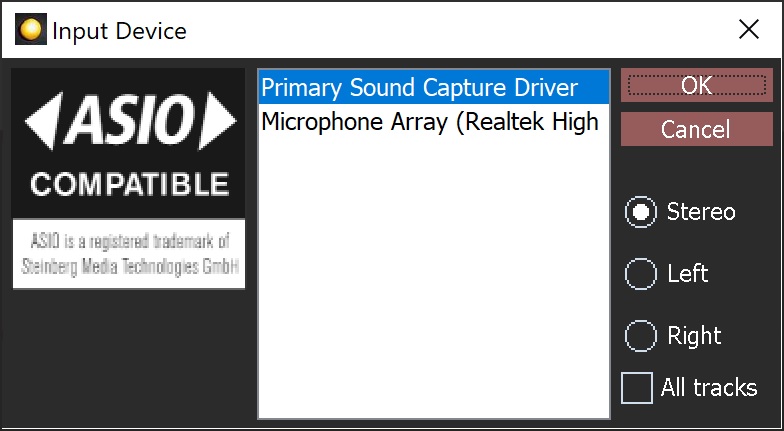
This dialog lists the available input devices. The input devices that are available and will be shown in this dialog will differ depending on your hardware. Typically, the "primary sound capture driver" will be the default input device selected in your operating system.
Use this dialog to select an input device. Choose whether you want to record a stereo signal (from both the left and right channels), only the left channel, or only the right channel. Future recorded waves will be two-channel stereo waves if you choose stereo and single-channel mono waves if you choose the left or the right channel. If you want the changes that you make here to be applied to all tracks, click on "All tracks". Click OK to save your changes.
(Tip: You can also click on Track and then on Input Device in the multitrack session menu to change the input device of the current track.)
Mute button
Use the mute button ( ) to mute a track. The track will not be heard when the session is played.
(Tip: You can also click on Track and then on Mute in the multitrack session menu to mute the current track.)
Solo button
Use the solo button ( ) to solo a track. All other tracks will be muted and will not be heard during playback, unless soloed as well.
(Tip: You can also click on Track and then on Solo in the multitrack session menu to solo the current track.)
Record button
Use the record button ( ) to select the track for recording. If you then start recording, the sound data will be recorded in this track. You can select more than one track for recording. This is useful if you have more than one inputs and you want to send different inputs to different tracks.
(Tip: You can also click on Track and then on Record in the multitrack session menu to select the current track for recording.)
Show volume envelopes button
Click on the show volume envelopes button ( ) to show or hide the volume envelopes of the track. The following is an example track, in which the volume envelope is shown.
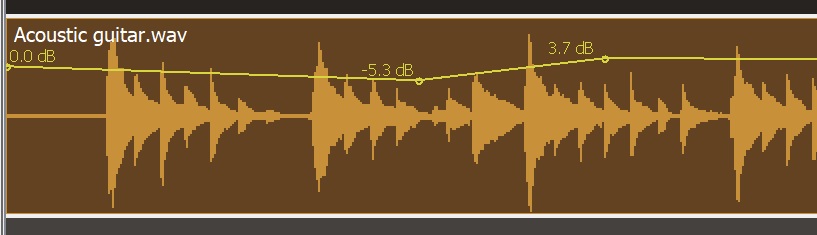
The volume envelope will be shown as a yellow line. Wherever the line slopes up with time, the volume of the track will increase gradually. In the example above, the volume of the track will increase from 0 dB at the beginning to +9 dB in the middle. Wherever the line slopes down with time, the volume of the track will decrease.
To make changes to the volume envelope, first click on the draw pointer ( ) in the pointer toolbar. You can then click on the track to add volume envelope points. You can also drag existing points to move them.
Show pan envelopes button
Click on the show pan envelopes button ( ) to see the pan envelopes of the track. The pan envelope will be shown as a blue line through the track (similar to the volume envelope line above). Whenever the pan envelope line slopes upward with time, the pan of the track will gradually shift to the right. Whenever the pan line slopes down with time, the pan of the track will shift to the left.
To make changes to the pan envelope, first click on the draw pointer () in the pointer toolbar. You can then click on the track to add pan envelope points. You can also drag existing points to move them.
Dry and wet mix controls and envelopes and other effect controls
See Orinj Effects and Orinj Working with effects for more information on the controls listed in this section.
Use the dry mix controls ( ) to change the dry mix of an effect. Use the wet mix controls (
 ) to change the wet mix of an effect. As with the volume and pan controls, you can type new dry or wet mix values, use the up and down arrows to increase the dry or wet mix, or press ENTER or double-click on the controls to see dry or wet mix dialogs. Click on the show dry mix envelopes button (
 ) to see the dry mix envelopes for the current effect in the track. Click on the show wet mix envelopes button (
 ) to see the wet mix envelopes for the current effect in the track.
As dry/wet mix values apply only to certain effects, the dry and wet mix controls may be disabled (grayed out) if the track has no effects of if the effect that is selected does not have a dry/wet mix.
The drop-down box ( ) shows the current effect.
Click on the modify effect button ( ) to modify the parameters of the current effect.
VU meter

The VU meter shows the volume amplitudes encountered during playback and recording for the left and the right channel. The buttons at the top of the control will light up if the track clips. Click on those buttons to return them back to normal.
Add new comment