admin: First posted on 2013 03 25
This post is here to present an illustrative and intuitive example of compressing drums. It includes a number of graphs that show the effect of a compressor on a drum snare. There are a number of explanations of how compressors work on the net (including on this site), but there are virtually no good intuitive examples of what compressors actually do with audio data.
A look at the snare
There are two reasons to look at drums, when it comes to compression. The compressor settings for drums that are usually recommended for getting "sharper" drums in the mix are all the same. With these, we know where to start. These settings are used below. Also, the drum hits – snares and kicks specifically – are very short. Even with the snare (and drum frame) ring, a recorded snare sample is almost always less than one second long, which makes it easy to work with and display visually.
Here is a picture of the actual snare hit. The recording of this snare hit can be heard below.
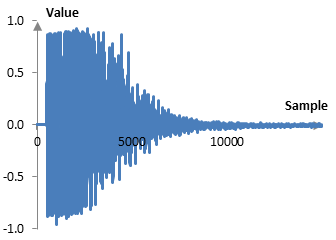
This is an actual 44.1 kHz 16-bit recording of a Yamaha Recording Custom 14x10 inch snare. The digital recorded samples were extracted from the wave file and placed in Excel to produce the graph above. The snare was recorded as a simple experiment with an SM57 pointed at the top edge of the snare (the usual top-and-bottom approach to getting a good snare was not used). There are a couple of problems with this recording, which are discussed below. As can be seen on the graph, the ring of this snare hit is quite long – over 5000 samples, which translates to over 0.1 seconds with the 44.1 kHz sampling rate. The purpose of the compressor would be to decrease this ring, while preserving the initial accent, thereby making the snare sharper in the mix.
To get a shaper snare, an engineer can obviously "ride the gain". The engineer would have to leave the gain as it is for the initial hit, but lower it for the subsequent ring. In the past, that would have been impossible – no engineer is that fast. Today, we can do so with various software, but, still, going through every snare in the recording would be time consuming and exhausting. This is where compressors come in. A compressor would adjust the gain automatically throughout the whole recording.
Getting the volume / amplitude envelope
To be able to work with the amplitude, the compressor will need to know what the amplitude is. Since a recorded wave oscillates many times up and down, not every point of the oscillating wave clearly indicates the amplitude level. There are a number of ways to measure the amplitude of a wave – peaks, Hilbert transforms – and some of these are quite mathematically involved. For the exercise below, to simplify things, we use an ad hoc root mean square (RMS) amplitude measurement – somewhat of a moving average of sample values. Obviously, different measures will produce different results, but this is not the point of this post. The following is the amplitude of the snare.
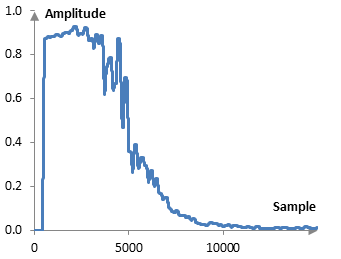
This is normalized amplitude. In 16-bit recordings, the absolute value of recorded samples can go from 0 to 215, but we can divide these values by 215 to normalize everything in the range of 0 to 1.
Compressor settings
The typical compressor settings for getting sharper drums in the mix are:
- Use a compressor threshold of -5 dB.
- Compress amplitudes above the threshold by a ratio of 3 to 1 (i.e., 3:1).
- Use a compressor attack of 15 ms and a compressor release of 50 ms.
In the range of 0 to 1, the -5 dB threshold translates to 10-5/20 = 0.562, if we assume that 0 dBVU is maximum amplitude. The -5 dB compression threshold on the amplitude envelope above would look something like this.
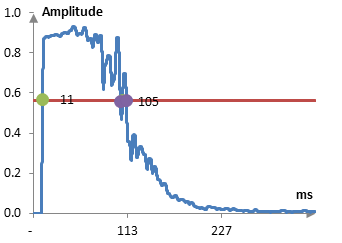
At about 11 ms from the beginning of the recording, the amplitude of the snare will exceed the threshold. The compressor will begin decreasing the amplitude of the recorded snare from that point on and, over the next 15 ms, will reach a compression ratio of 3:1. For example, the amplitude of the signal reaches about 0.9, which is about -0.9 dB = 20 log10 0.9. This is 4.1 dB above the threshold and will be compressed to 4.1 / 3 = 1.3 dB over the threshold.
Somewhere around 104 ms into the recording, the snare amplitude will drop below the threshold and the compressor will start releasing – changing the compression ratio from 3:1 back to 1:1 (no compression) (if we ignore the quick crossing of the compression threshold back and forth around there). The compressor will reach the 1:1 ratio 50 ms after the release.
The resulting amplitude envelope, compared to the original one, should look something like the following.
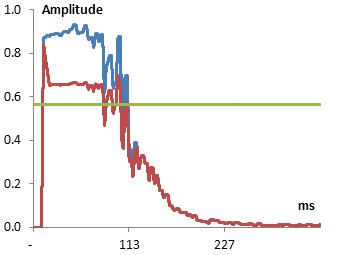
Note that it takes some time (15 ms) for the compressor to drop the amplitude and some time (50 ms) to bring back the amplitude to its original level. The 15 ms attack here is very important. It allows the compressor to preserve the initial hit if the snare. The release is also important. It allows the compressor to continue dropping the ring of the snare smoothly after the amplitude of the signal has dropped below the threshold. Finally, note also that the compressor does not drop the amplitude level so far that it drops below the threshold. It simply changes the amount by which the signal overshoots the threshold.
The compressed signal
With everything above, it is pretty obvious what the compressed signal should look like. The original and compressed snare hits are shown below.
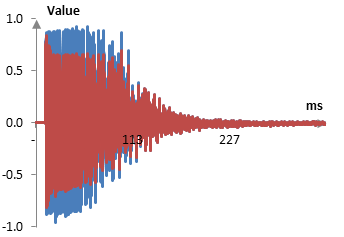
Thus, the compressor preserves some of the initial accent and decreases the amplitude of the remaining ring. Since the signal amplitude crosses the threshold a bit before the peak of the amplitude of the initial hit, the initial hit is slightly lower. Some additional output gain (perhaps 1 dB) should be added to the signal. In fact, since now the snare may sound very different, more than one dB could be needed. Most compressors will allow for additional output gain.
The following is a recording of the original snare (the first four hits) and the compressed snare (the last four hits).
Click Play to hear the snare.
Some additional info on compression
In full honesty, the compression settings used for the sound recording were different. This is because of the specifics of this sound recording, which are explained below. In short, this was not a very good recording. It clipped at the beginning and rang too much at the end and so a larger attack (30 ms), larger release (150 ms), and larger compression ratio (4:1) were used. These "larger" settings also helped with getting a sufficiently pronounced difference between the original and compressed samples in the sound clip above.
Here is an extract of the initial uncompressed hit.
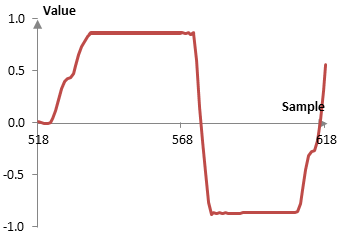
Although the initial hit of a drum never looks pretty, this seems to be an obvious clip. With this type of recording, the actual amplitude envelope computed with the Hilbert transform – which is what most compressors will do – looks as follows.
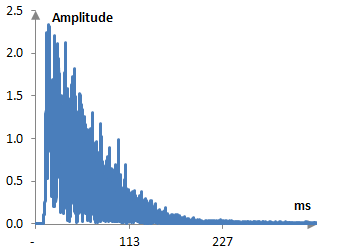
This is a much more difficult amplitude envelope to understand and work with. A specific problem with this envelope is the excessively high amplitude computed at the beginning (of over 2), which will result in a very significant dB drop during the compression depending on the attack and may warrant a slower attack (a slower attack was used for the actual sound clip).
Some issues with compression after release
What a compressor does with the signal above the threshold is somewhat obvious. With the settings above, if the signal exceeds the threshold by 4 dB, the compression will change the amplitude so that the signal exceeds the threshold by 4 / 3 = 1.3 dB (see also the topic on compression / expansion of dynamics in our wiki).
What is really not obvious is what a compressor does during a release, when the amplitude of the signal is below the threshold, but the compression ratio has not yet returned to "no compression". The formula above cannot possibly apply and there is basically no explanation to be found on the net. Here are the steps that the compressor in this example uses to do its job, which are designed to be as simple as possible. These may be different than the way other compressors are designed.
- Assuming a signal is at max (0 dBVU) and has to drop to the threshold (-5 dB) over 15 ms, compute an "attack per sample". 15 ms are equal to 662 samples, given the 44.1 kHz sample rate. If the attack is meant to drop 5 dB in 662 samples, then the attack should drop 0.007553 dB per sample.
- Similarly, if the release is 50 ms, the release should add 0.002268 dB per sample.
- Compute the "desired compression" in dB for each sample. The desired compression is compressed amplitude envelope, assuming the attack and release are zero.
- Compute the actual compression at each sample, by taking the dB value of the previous compressed sample, and adding an attack or release per sample depending on whether the actual compression needs to go up or down to get closer to the desired compression. Only one "attack per sample" or one "release per sample" are allowed and, hence, it may take some time (up to the attack and release time) for the actual compression to reach the desired compression.
authors: mic

Add new comment