Orinj version 9.0.0
One track in the Orinj session can contain multiple waves, MIDI files, and loops. These sound blocks can contain the same or different sound data and point to the same or different files on your hard disk. A session track can contain wave, MIDI, and loop blocks at the same time.
Each session track has its own controls for volume, pan, effects, and automations. These controls apply to all blocks in the track.
Auxiliary channels
Auxiliary channels in Orinj are tracks. Working with them is similar to working with tracks and the information below applies to auxiliary channels as well.
Auxiliary channels appear as tracks and contain the same volume, pan, effect, and automation controls. Instead of sound blocks, auxiliary channels get their sound data from other tracks. You cannot record a sound block to an auxiliary channel.
Track control panel and menu
Controls for each track in the session are to the left of the track.
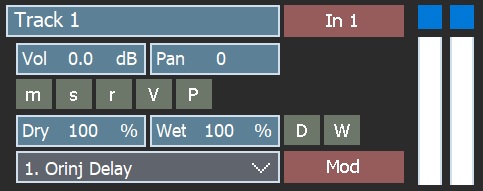
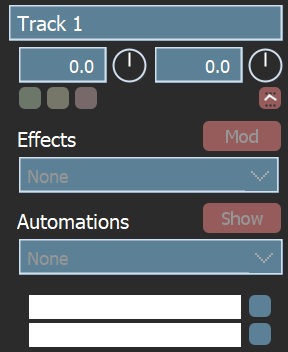
When expanded, the track control panel shows additional controls.
Many of the controls for Orinj tracks are repeated in the Orinj menu. For example, you can click on the mute button (the first of the three small buttons in the track controls panel) to mute a track, but you can also click on Track and then on Mute in the Orinj menu.
Rename tracks
Type the new track title in the track control panel to the left of the track. In the picture above, for example, the name of the track is "Track 1". You can type anything instead of "Track 1" as the new name of the track.
Naming a track changes your session only to the extent that recorded waves carry the name of the track, which may help you organize your session.
Add tracks
To add a track, click on Session, Tracks, and then Add Track in the Orinj menu. A new track will be added before the one that is currently selected.
To add an auxiliary channel, click on Session, Tracks, and then on Add Aux Channel in the Orinj menu.
Remove tracks
Click on the track to select it. Then click on Session, Tracks, and then Remove in the Orinj menu. When a track is removed, the wave files that are part of that track are removed from the session but remain on your hard drive.
Move tracks
Click on the track to select it. To move the track up in the track order, click on Track and then on Move Up in the Orinj menu. To move the track down, click on Track and then on Move Down in the Orinj menu.
Mute tracks
Click on the mute button (the first of the three small buttons under the volume control) in the track control panel to the left of the track or click on Track and then on Mute. The waves in the track will be grayed out and will not play during playback.
You can still move, remove, and otherwise operate with the track and its waves.
To unmute the track and its waves, click on the mute button or click on Track and then on Mute in the Orinj menu again.
If you want to mute individual waves rather than the whole track, see Orinj Working with session blocks.
Solo tracks
Click on the solo button (the second of the three small buttons under the volume control) in the track control panel to the left of the track or click on Track and then on Solo in the Orinj menu. The waves in all other tracks, unless other tracks are soloed as well, will be grayed out will not play during playback.
To remove the soloing of a track, click on the solo button or click on Track and then on Solo in the Orinj menu again.
A track that is sent to an auxiliary channel may also be soloed. However, soloing mutes all other tracks, including auxiliary channels. The soloed track may not be heard if the auxiliary channel itself is muted. The track will be heard if the auxiliary channel itself is also soloed.
A track that is not soloed will be heard if sent to an auxiliary channel that is soloed.
Change the volume of tracks
Use the volume controls – the box and the knob – in the track control panel to the left of the track. You can type the new volume or drag the knob up or down.
The track volume is measured in decibels and can be between -40 dB and 40 dB.
You can also click on Track and then on Volume in the Orinj menu. You will get the following dialog.
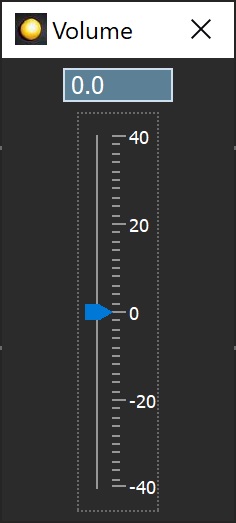
Use the dialog to adjust the volume and close it when you are done.
Volume automation
To change the volume for a portion of the track, use volume automations. Right-click on the volume controls and choose Add Automation in the popup menu. The volume automation envelope will be visible above the track and its blocks.
The volume of the track will increase for the portions where the automation line goes up, decrease where the line goes down, and stay constant where the line is horizontal. The places where the line changes direction are the automation points.
Initially, the volume automation envelope will be horizontal with only two points – one at the beginning and one at the end. You can add, delete, and move points.
- To add automation points, click on the draw mouse pointer button (
 ) in the pointer toolbar at the bottom of Orinj. Then click on the track at the position at which you want to have a point.
 - To move points, click on them and drag them. The mouse pointer should be the same draw pointer.
- To delete points, select the track over the points that you wish to delete and click on Track and then on Delete Automation Points in the Orinj menu.
Automations begin at the start of the track and end at the end of the last sound block in the track. If the track is empty, the automation may not be visible as it will begin and end at the start of the track. The end time of automations will adjust as you add, remove, or record blocks to the track.
Automations in Orinj belong to the track and not to the sound blocks in the track. If you move a block, for example, the automation points will not move with the block.
To remove an automation, right-click on the corresponding controls and then choose Remove Automation in the popup menu. To remove the volume automation, for example, right-click on the volume controls.
To hide an automation, select the automation in the list of the automations in the track control panel to the left of the track and click on Hide. Since the automation is not removed but simply hidden, it remains active.
To show a hidden automation or to show some other automation than the one that is currently visible, select that automation in the list of automations in the track control panel to the left of the track and click on Show.
Change the pan of tracks
Use the pan controls – the box and the knob – in the track control panel to the left of the track. You can type the new pan or drag the knob up or down.
The pan is measured in percent and can be between -100 percent (left channel only) and 100 percent (right channel only). Panning in Orinj is linear. A pan value of 25 percent, for example, will increase the amplitude of the right channel by 25 percent and decrease the amplitude of the left channel by 25 percent.
You can also click on Track and then on Pan in the Orinj menu. You will get the following dialog.
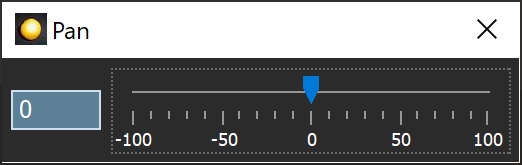
Use the dialog to adjust the pan and close it when you are done.
Pan automation
If you want to change the pan for a portion of the track only, use pan automations. Right-click on the pan controls and choose Add Automation in the popup menu.
Change the input device of tracks
When you record to a track, the track takes sound data from a specific input device (i.e., sound card). To change that input device, click on Track and then on Input Device in the Orinj menu. You will see the following dialog.
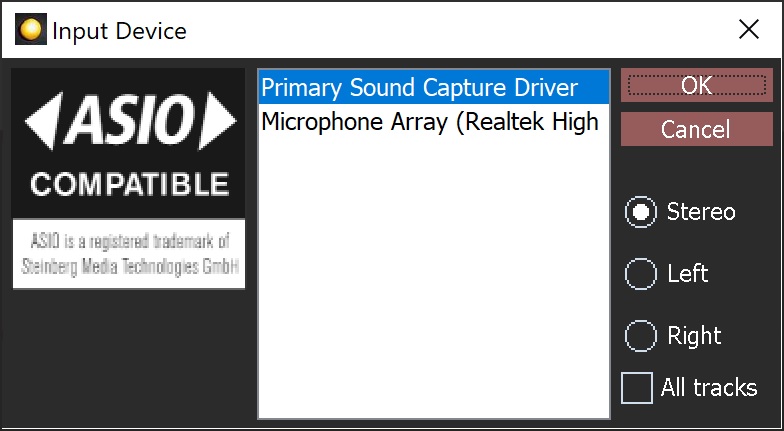
All available input devices (soundcards) will be listed in this dialog. Choose the device from which you want the track to obtain recorded data and click OK.
Choose a sampled audio device to record sampled audio data to a wave file. Choose a MIDI device to record MIDI events to a MIDI file.
You cannot record to a track that is an auxiliary channel and you cannot set the input device for an auxiliary channel track. The input device button for an auxiliary channel track is titled "Tracks". Clicking on it allows you to change what tracks are sent or copied to that auxiliary channel.
Prepare tracks for recording
Click on the record button (the third of the three small buttons under the volume controls) in the track control panel to the left of the track or click on Track and then on Record in the Orinj menu. If there are any waves in the track, they will become red.
You can record to more than one track at the same time. You can record to tracks even if these tracks already contain recorded waves. These waves will not be changed.
If the input device for the track is a sampled audio device, Orinj will record sampled audio and place these audio data in a wave file. If the input device for the track is a MIDI device, Orinj will record MIDI events and place these data in a MIDI file.
Add effects to tracks, remove effects, modify effects
See Orinj Working with effects and Orinj Effects for more information.
Premix tracks
Click on Track and then on Pre Mix in the menu. To remove premixing, click on the same menu command.
A premixed track is mixed into a single wave file every time it changes (e.g., when adding blocks, moving blocks, or adding effects). This file is temporary. It is usually stored next to your session and will be deleted when exiting or when you start a new session.
The premixing of tracks that are selected for premixing happens in the background. It is automatic and starts every time the track or its effects change. You will not know that Orinj is preparing the track, unless you play the session while this preparation is still going on. In that case, you will get a message that tracks are being premixed and playback will wait until the premixing is complete.
Premixed tracks help by reducing the computations that Orinj does when playing and recording. However, during playback, you cannot change premixed tracks, other than to mute and solo them. You should choose tracks for premixing that are mostly complete in terms of production. Also, you should only choose tracks for premixing when you need more computational power, such as when playback skips (see Orinj CPU usage status bar).
There are several controls that will be unavailable for premixed tracks during playback. These include effects, dry and wet mix, dry and wet mix envelopes, and adding, moving or removing of blocks. These same controls are available when there is no playback.
You should not premix a track that contains side chained effects. Side chaining means that the effect depends on another track. Tracks are premixed individually. The sound data from another track that is used to control this effect will not be available.
Premixing does not mean "locking". The track is not locked, and you can still change it.
Group tracks
Click on Session, then Tracks, and then on Groups in the Orinj menu. You will see the following dialog.
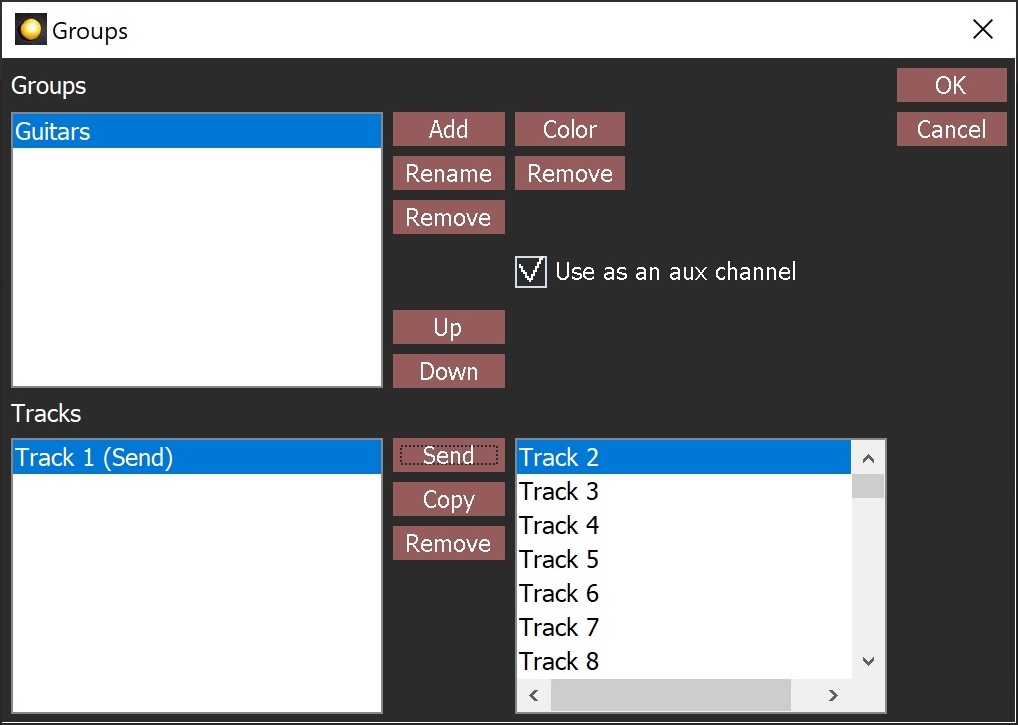
Existing groups are listed in the top left.
To create a group, click on the Add button. To remove a group, select it and click on the Remove button. To rename a group, click on the Rename button. To choose a color for the group, click on the Color button. To remove the color of a group, click on the Remove button under the Color button.
Groups are a way to mark and order tracks. They do not affect the sound mix. If a group has a color, the color will show up in the session, in the track control panel to the left of each track that belongs to the group. To order all tracks according to the groups, click on Session, then on Tracks, and then on Order Groups in the Orinj menu.
All tracks that belong to a group are listed in the bottom left. All tracks that do not belong to a group are listed in the bottom right.
To add a track to the group, select it in the list on the right and click on the Add button. To remove a track from a group, click on the track in the left (bottom) and click on the Remove button next to that list of tracks.
Click on OK in the Groups dialog when you are done.
Add new comment