Orinj version 9.0.0
Record the guitar
- If you are not looking at the Orinj session view, click on the session view button (
 ) in the view toolbar at the bottom of Orinj.
 - Type "Guitar" as the name of the third track in the track control panel to the left of the track. The track will become selected and will be lighter in color than the rest of the tracks.
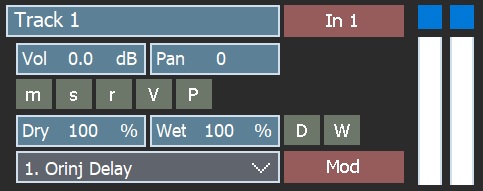
- Click on the record button in the track control panel for the same track. This button will light up, which means that this track is selected for recording.
The record button is the last of the three buttons at the bottom left of the track control panel shown below.
- Click on the rewind to start button (
 ) in the player toolbar at the bottom of Orinj to make sure that recording starts at the very beginning of the track. The play cursor (the vertical yellow line) will move to the start of your session.
 - Click on Track and then on Input Device in the menu.
- In the Input Device dialog that pops up, pick the input device that you want. Choose whether you want to record a stereo wave or a mono wave from the left or the right channel.
- Connect your equipment. How you do that depends on what equipment you have.
- Click on the record button (
 ) in the player toolbar at the bottom of Orinj to start recording. Orinj will start simultaneous playback and recording.
 - When you are finished recording, stop playback and recording by clicking on the stop button (
 ) in the player toolbar at the bottom of Orinj.
 - Unclick the record button in the track control panel to the left of the track, in which you recorded. When you do so, the recorded wave will become orange from red. This makes sure you do not accidentally start recording in this track later.
- Click on File and on Save in the Orinj menu to save your session.
You can now play your recording. Click on the play button ( ) in the player toolbar at the bottom of Orinj. When you are done listening, click on the stop button () in the same player toolbar.
Sound devices
Explanation: You can select more than one track for recording if you have more than one input or if you want to record the left and right channels separately. The record button in the track control panel to the left of the track should be pressed for each track, in which you want to record. A different input device can be selected for each track.
If you record mono input (e.g., a simple direct line in guitar) to stereo, you will get a stereo track in which both channels contain the same signal. If, on the other hand, you have two signals (e.g., two separate instruments or the same instrument with two microphones), you can record these signals to one stereo track (two channels with different signals) or two separate tracks. Recording to two separate tracks makes editing later easier.
The output device for the session is independent of the output device in the loop view or the wave view.
Recording
Explanation: If you make a mistake during the recording and want to remove the recorded wave from the session, you can do so. Right-click on the wave and choose Block Remove to remove the wave without deleting it from the hard disk. Alternatively, click on the wave and then click on Block and then on Destroy to both remove the wave from the session and delete the file from hard disk. Deleting the wave from the hard disk cannot be undone.
If you want recording to start with a delay after you press the record button (), click on Preferences and then on Recording Delay. Choose how long the delay should be in seconds. After the start of recording, Orinj will start a countdown to allow you to prepare.
With the right setup, during recording, you will see the wave drawn on the screen and the VU meter for the track move to measure the incoming signal. If no signal is coming in, you can stop the recording, delete the recorded wave, check your equipment, and start over again.
A VU meter is shown here.

There is one for each track in the session view. To see the VU meter for a track, expand a track by clicking on its Expand button (the small button under the pan knob in the track control panel to the left of the track).
Playback
Explanation: If you want to play only the recorded wave without the other tracks, click on the solo button in the track control panel to the left of the track. The solo button is the second one of the three buttons in the bottom left of the track control panel (see picture above). If you want to remove the soloing, click on this button again. You can select more than one track for solo. The tracks that are soloed will be played. The tracks that are not soloed will be muted.
Latency
Explanation: If your input device has significant latency, you may hear a delay in the recorded piece. That is, even if you played your guitar precisely on beat, what you hear after you stop recording and start playing the recorded piece back may not be precisely on beat.
You can always move the recorded piece. Click on the mouse cursor for moving ( ) in the pointer toolbar at the bottom of Orinj. Then drag the recorded piece left or right. Zooming into the session helps to be more precise (i.e., click several times on the zoom in horizontally button (
 ) first, then move the piece, then zoom out).
You can also specify a latency when you choose your input device. Orinj will adjust the recording accordingly.
Saving your session
Explanation: Saving your session has no impact on saving the wave itself. The actual wave that you just recorded is already on your hard drive as Orinj records directly to the hard drive. You do not need to do anything else to save that file.
Saving the session itself saves information on how the wave is used in the session (e.g., which track it belongs to, where it starts, etc.).
Record the vocals
Vocals can be recorded in the same way. Repeat the steps above on another track and you can record your vocals and any other instruments. If, at some point, you record an actual bass rather than the MIDI bass, you can mute the MIDI bass by clicking on the mute button in the track control panel to the left of the MIDI bass track. The mute button is the first of the three buttons in the bottom left of the track control panel (see picture above).
See also
This completes the fourth part of the Orinj tutorial – recording guitar and vocals. The remaining parts of this tutorial are as follows.
Orinj Getting started - Part 1 - Set basic Orinj preferences and prepare your session
Orinj Getting started - Part 2 - Build a drum loop
Orinj Getting started - Part 3 - Create drum and bass tracks
Orinj Getting started - Part 5 - Mix your song
Add new comment