Orinj version 9.0.0
Pan
- Adjust the pan knob in the track control panel to the left of a track.
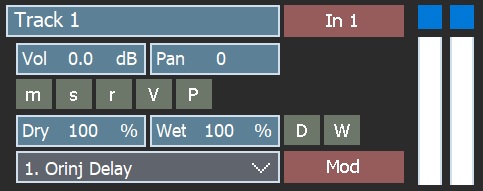
The pan knob is the one on the right in the track control panel shown below.
Explanation: The session view is the Orinj mixer. It is where you will record and build your session and where you will adjust volume and pan, add effects, and produce your song.
You can adjust the pan during playback or when there is no playback.
A negative pan value means panning to the left. -100% is panning fully to the left (i.e., no signal in the right channel). A positive pan value means panning to the right. 100% is panning fully to the right.
Orinj always uses stereo signals. Mono tracks are converted to stereo tracks. Thus, panning works the same way for both mono and stereo tracks.
Volume
- Adjust the volume knob in the track control panel to the left of a track. The volume knob is the left one in the track control panel.
Explanation: The track volume can be between -40 db and 40 dB.
Volume and pan automations
If you want to change the volume or pan of a portion of the track, use volume and pan automations. Right-click on the pan controls or volume controls in the track control panel to the left of the track to add automations. Click on the automation lines and drag points to change automation values.
You can change automations both before and during playback.
Effects
Orinj provides several stock effects, including delays, compressors, reverbs, and equalizers. See Orinj Effects and Orinj VST support for more information.
To see the effects added to a track, expand the track. Click on the small button under the pan control in the track control panel to the left of the track. The track will be expanded to show its effects and automations.
You can add, remove, or modify effects both before and during playback.
Mix your song
- Click on Session and then on Mix To File in the Orinj menu.
Explanation: After mixing your song, Orinj will switch to the wave view, where your mix will be displayed. There, you can save your mix, add effects to it, or otherwise change it.
See also
This completes the fifth and last part of the Orinj tutorial – mixing your song. The remaining parts of this tutorial are as follows.
Orinj Getting started - Part 1 - Set basic Orinj preferences and prepare your session
Orinj Getting started - Part 2 - Build a drum loop
Orinj Getting started - Part 3 - Creating drum and bass tracks
Orinj Getting started - Part 4 - Record guitar and vocals
Add new comment