Orinj version 9.0.0
The following is a tutorial for those not familiar with Orinj. If you have already used Orinj or similar software, you do not need this tutorial.
This tutorial will help you record a simple song. You will play the guitar, sing the vocals, and use Orinj to create drum and bass tracks.
The tutorial is organized in five parts.
Part 1 - Set basic Orinj preferences and prepare your session
Part 2 - Build a drum loop
Part 3 - Create drum and bass tracks
Part 4 - Record guitar and vocals
Part 5 - Mix your song
Part 1 - Set basic Orinj preferences and prepare your session
Check your sound buffers
- Start Orinj.
- Click on Preferences and then on Buffers in the menu.
- In the buffers dialog, adjust your buffer numbers and sizes.
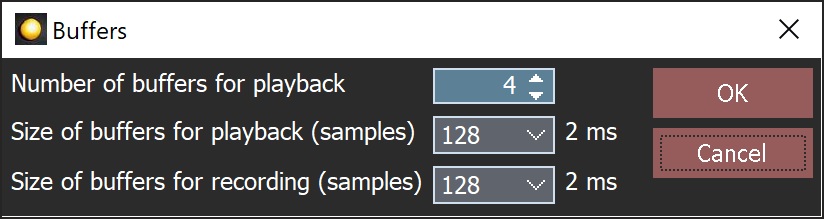
- Click OK.
Explanation: The size of the buffer is the amount of data that Orinj reads from the hard drive, writes to the hard drive, sends for playback, or receives from recording at one time.
With larger buffers, there are fewer attempts to access the hard drive or the soundcard, which makes Orinj faster when working with audio data. However, very large buffers can make Orinj respond more slowly to your commands. For example, when you stop playback, you may have to wait for the current buffer to be processed, before playback stops.
The number of buffers used is not as important as the size of buffers. With the current design of Orinj, a larger number of buffers only helps at the beginning of playback, where there is extra processing.
You cannot know immediately what buffer sizes are appropriate. The sizes shown here may not be the best for your setup.
As you record and play, choose a size that is small enough so that Orinj is responsive to your commands, but not too small to cause problems when Orinj is processing audio (e.g., when playback skips).
Orinj will remember the buffer settings next time it starts.
There is no direct monitoring in Orinj. That is, the signal that comes into Orinj for recording is not played back through Orinj (it might be played back by the recording device or soundcard, but that is independent of Orinj). Since Orinj does not use direct monitoring, there is no need for its buffers to be very small. You could use very small buffers (e.g., 1 ms), but you can also use buffers that are much larger (e.g., over 50 ms) without noticing any changes to performance.
Start a new session
- Click on the session view button (
 ) in the view toolbar at the bottom of Orinj to switch to the Orinj session view. (If the button is disabled, you are already there.)
 - You should already have a blank recording session. You will see empty tracks. If you want to start a new session in any case, click on File and on New in the Orinj menu.
- You will see the Audio Format dialog, which will prompt you to select the audio format of your session.
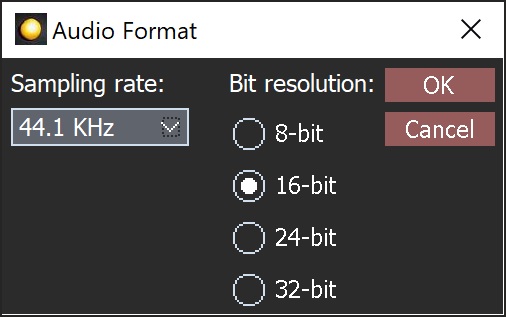
- Click OK.
- Click on File and then on Save As in the Orinj menu to save your session.
- Browse to where you want to save your session (probably the same place where you saved your drum loop file).
- Give your session a name (for example, "my session").
- Click on the Save button.
Explanation: The recording session is your song. This is where you will build or record tracks with various wave, loop, and MIDI pieces.
Multiple sampling rates (up to 99.2 kHz) and all standard sampling resolutions (8, 16, 24, and 32 bit) are supported.
A new session is ready every time you start Orinj. The default settings for this new session are 48 kHz, 24-bit.
The sampling rate and resolution of the session are used when recording new waves and when sending the session mix to the output device for playback.
Check your output devices
- Click on Session and then on Output Device in the menu.
- In the window that pops up, choose an output device.
- Click on OK.
- Click on File and then on Save to save your session.
Explanation: Your computer may have multiple output devices for audio, and you should choose which device should be used to play your session. After making changes to a session, it is a good idea to save it.
See also
This completes the first part of the Orinj tutorial – setting up basic Orinj preferences and preparing your session. The remaining parts of this tutorial are as follows.
Orinj Getting started - Part 2 - Build a drum loop
Orinj Getting started - Part 3 - Create drum and bass tracks
Orinj Getting started - Part 4 - Record guitar and vocals
Orinj Getting started - Part 5 - Mix your song
Add new comment