Orinj version 9.0.0
The Orinj Compressor automatically adjusts the amplitude of the incoming signal, usually to bring together quieter and louder parts of the signal.
This is a multiband, multi-threshold compressor. Compression can be applied to up to three different frequency bands separately and with several compression ratios at different signal levels.
See Compressor (of dynamics) for more information on effects of this type.
An example of the Orinj Compressor
The following sound sample contains an acoustic guitar solo. The two channels of the recording differ. The left channel contains the guitar solo as recorded, without compression. The right channel uses a multi-threshold compressor. Up to -35 dB, the compressor expands the signal with a ratio of 2:1. Between -35 dB and -25 dB, the compressor leaves the signal unchanged. Above -25 dB, the compressor compresses the signal with a ratio of 8:1. This is a forward-looking peak compressor that looks 1 ms ahead. The attack is 1 ms and the release is 200 ms. What is most noticeable about this compressor is the sustain added to the guitar. Because of this sustain, the sound will shift to the right (towards the compressed signal) after the initial accent of the notes and during their sustain (that is, the right channel is louder during the sustain).
Click to play this example with a multi-threshold compressor.

Using the Orinj Compressor
The Orinj Compressor can be added to tracks, auxiliary channels, and the master channel in the session view and to waves in the wave view.
- To add the effect to a track or an auxiliary channel in the session, first click on the track or auxiliary channel to select it. Click on Effect, Dynamics, and then on Orinj Compressor in the menu.
- To add the effect to the master channel in the session, click on Track and then on Master Channel in the menu. In the master channel dialog, click on the Add button.
- To add the effect to a wave in the wave view, click on Effect, Dynamics, and then on Orinj Compressor in the menu.
You will see the following dialog.
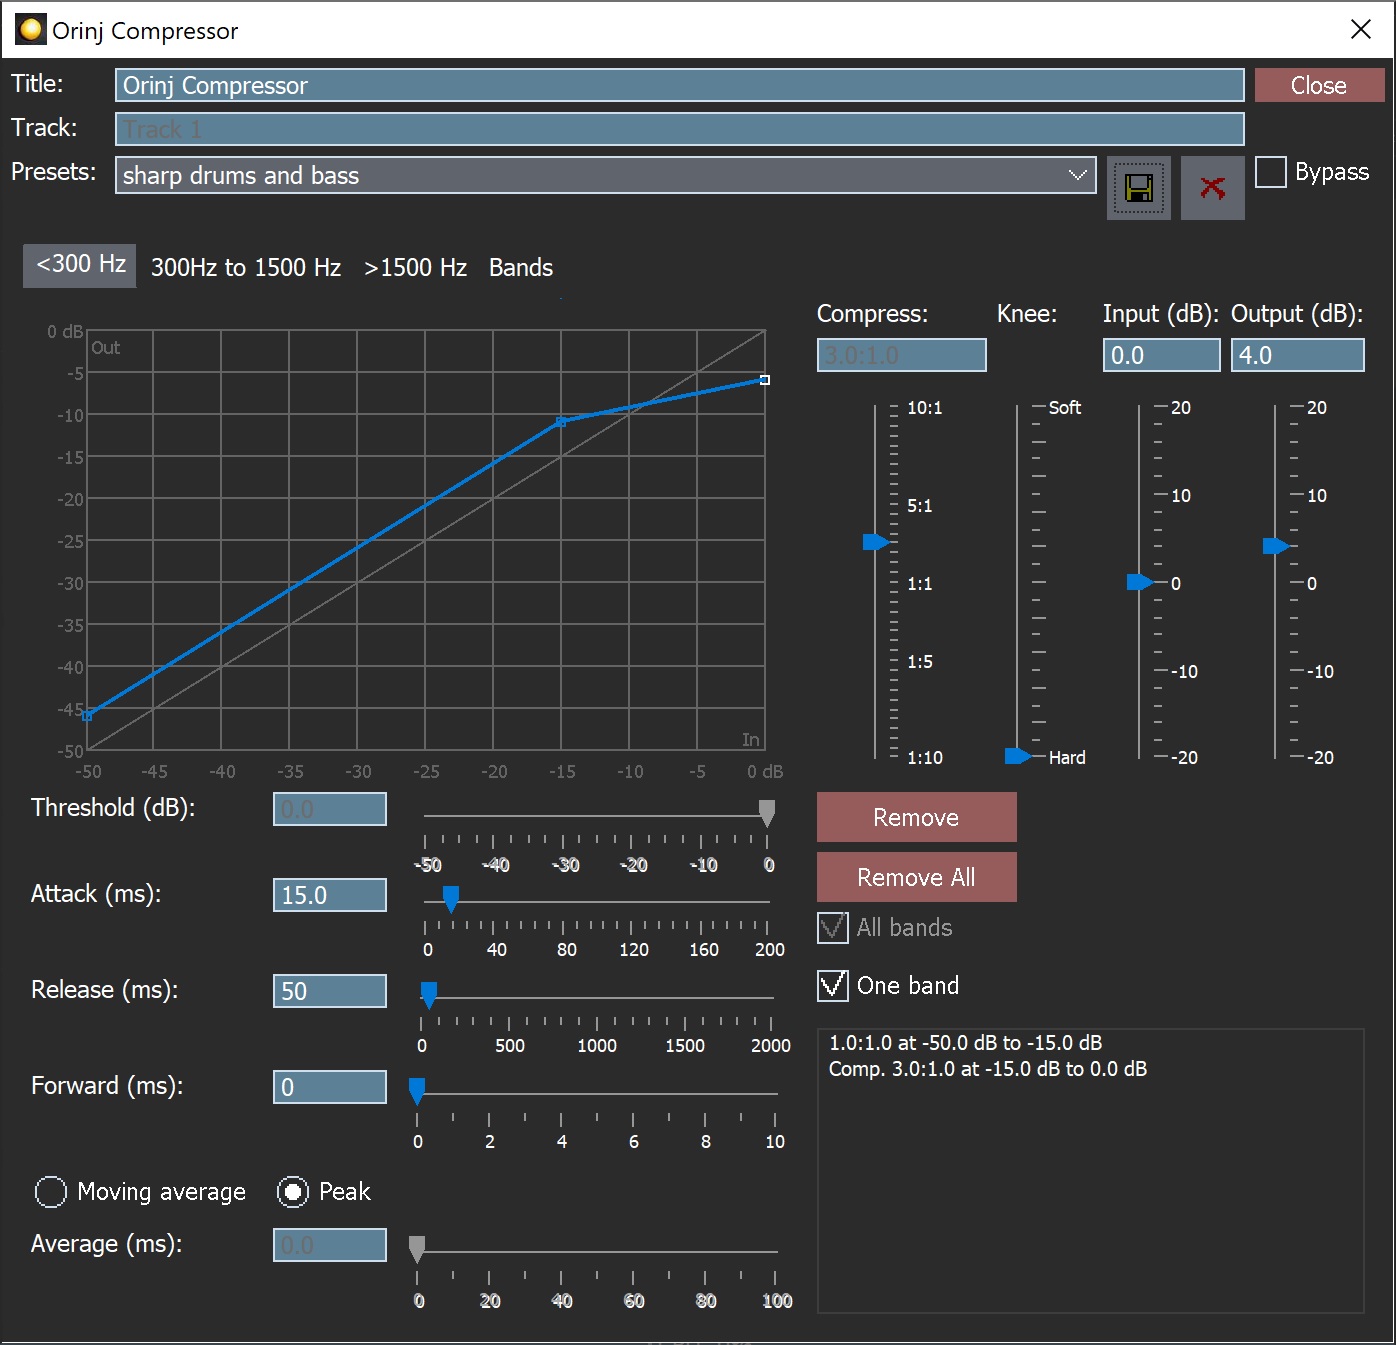
When this dialog becomes visible, the Orinj Compressor has been added. Adjust the compressor parameters in the dialog and click on Close.
Orinj Compressor parameters
See Orinj Effects for an explanation of the Title, Track, Presets, and Bypass controls. The remaining Orinj Compressor controls are described below:
- Band tabs: Use the band tabs to switch between the frequency bands of the compressor (by default, these bands are "< 300 Hz", "300 Hz to 1500 Hz", and "> 1500 Hz") or to switch to the last tab, where you can change the compressor bands.
The tabs for each band contain the following controls.
- Graph: Use the graph to add or move compressor points. The graph shows how the compressor changes the amplitude of the output signal based on the amplitude of the input signal. The horizontal axis of the graph shows the input signal levels – from -50 dB to 0 dB. The vertical axis shows the corresponding level of the output at each level of input. The compression line shows how input and output levels relate. If the line is at 45 degrees, there is no compression or expansion (in the example picture above, the line is at 45 degrees between -50 dB and -15 dB). As the line becomes flatter, high levels if input result in low levels of output, increasing compression (in the example picture above, the compression ratio is 3:1 between -15 dB and 0 dB). As the line becomes steeper, low levels of input result in high levels of output, increasing expansion. The compression / expansion ratio is between 10:1 and 1:10. The points on the graph show where the compression ratio changes. You can click on points to select them. You can drag points to move them. You can also click anywhere on the graph to create a new point.
- Threshold: Use these controls – the box and the slider – to set the threshold of the selected point. The threshold is measured in decibels and each threshold point can be placed anywhere between 0 dB and -50 dB.
- Attack: Use these controls – the box and the slider – to set the attack of the compressor. The attack is the time it takes for the compressor to change the amplitude of the signal so that the compression / expansion ratio moves from 1:1 to the needed compression / expansion ratio. The attack is measured in milliseconds (ms) and can be between 0 ms and 200 ms.
- Release: Use these controls – the box and the slider – to set the release of the compressor. The release is the time it takes the compressor to change the amplitude of the signal so that the compression / expansion ratio changes from the needed compression / expansion ratio back to 1:1. The release is measured in milliseconds (ms) and can be between 0 ms and 2000 ms.
- Knee: Use this slider to define how smoothly the ratio of compression or expansion changes from one level to the next. At the "minimum" value, there is no knee and the transition from one compression / expansion ratio to the next is sudden. At the "maximum" level, the transition is smooth. This slider controls the transition at all threshold points of the compressor at the same time.
- Forward: Use these controls – the box and the slider – to set the amount of time that the compressor looks ahead when adjusting the amplitude of the signal. With value of 5 ms, for example, the compressor will begin to adjust the amplitude of the signal 5 ms before that signal reaches a compression / expansion threshold. This look ahead time parameter is included to allow quick compression at the very beginning of signal peaks, but without a very short attack, since very short attacks can change the underlying form of the signal and introduce distortion. If the attack of the compressor is also set at 5 ms, then the compression will reach its full compression / expansion ratio at the moment at which the signal reaches the specific compression / expansion threshold. The amount of time that the compressor looks ahead is measured in milliseconds and can be between 0 ms and 10 ms.
- Peak / moving average: Use these buttons to select whether the compressor should monitor the peaks of the amplitude envelope or an average of the values of the amplitude envelope for an interval of time. A moving average of the values will make the transitions between amplitudes and the corresponding reactions of the compressor smoother.
- Average: Use these controls – the box and the slider – to define the length of the interval, over which the compressor will compute and monitor a moving average of the values of the amplitude envelope. The moving average interval is measured in milliseconds and can be between 0 ms and 100 ms.
- Compress / expand ratio: Use this slider to change the compression / expansion ratio of the selected point in the graph. The ratio can be between 10:1 (compression) and 1:10 (expansion).
- Input: Use these controls – the box and the slider – to give additional gain to the input signal of the compressor. Increasing the input gain is equivalent to lowering the threshold, but is easier if there are several thresholds. This gain is measured in decibels and can be between -20 dB and 20 dB.
- Output: Use these controls – the box and the slider – to give additional gain to the output signal. This gain is measured in decibels and can be between -20 dB and 20 dB.
- All bands: Click on this control to make all three compressor bands the same. The compressor will adjust the parameters of the second and third frequency bands, so that they are the same as the parameters of the first band.
- One band: Click on this control to create a single band compressor. If this is checked, the compressor will not separate the signal into bands.
The last tab in the Orinj Compressor dialog is as follows.
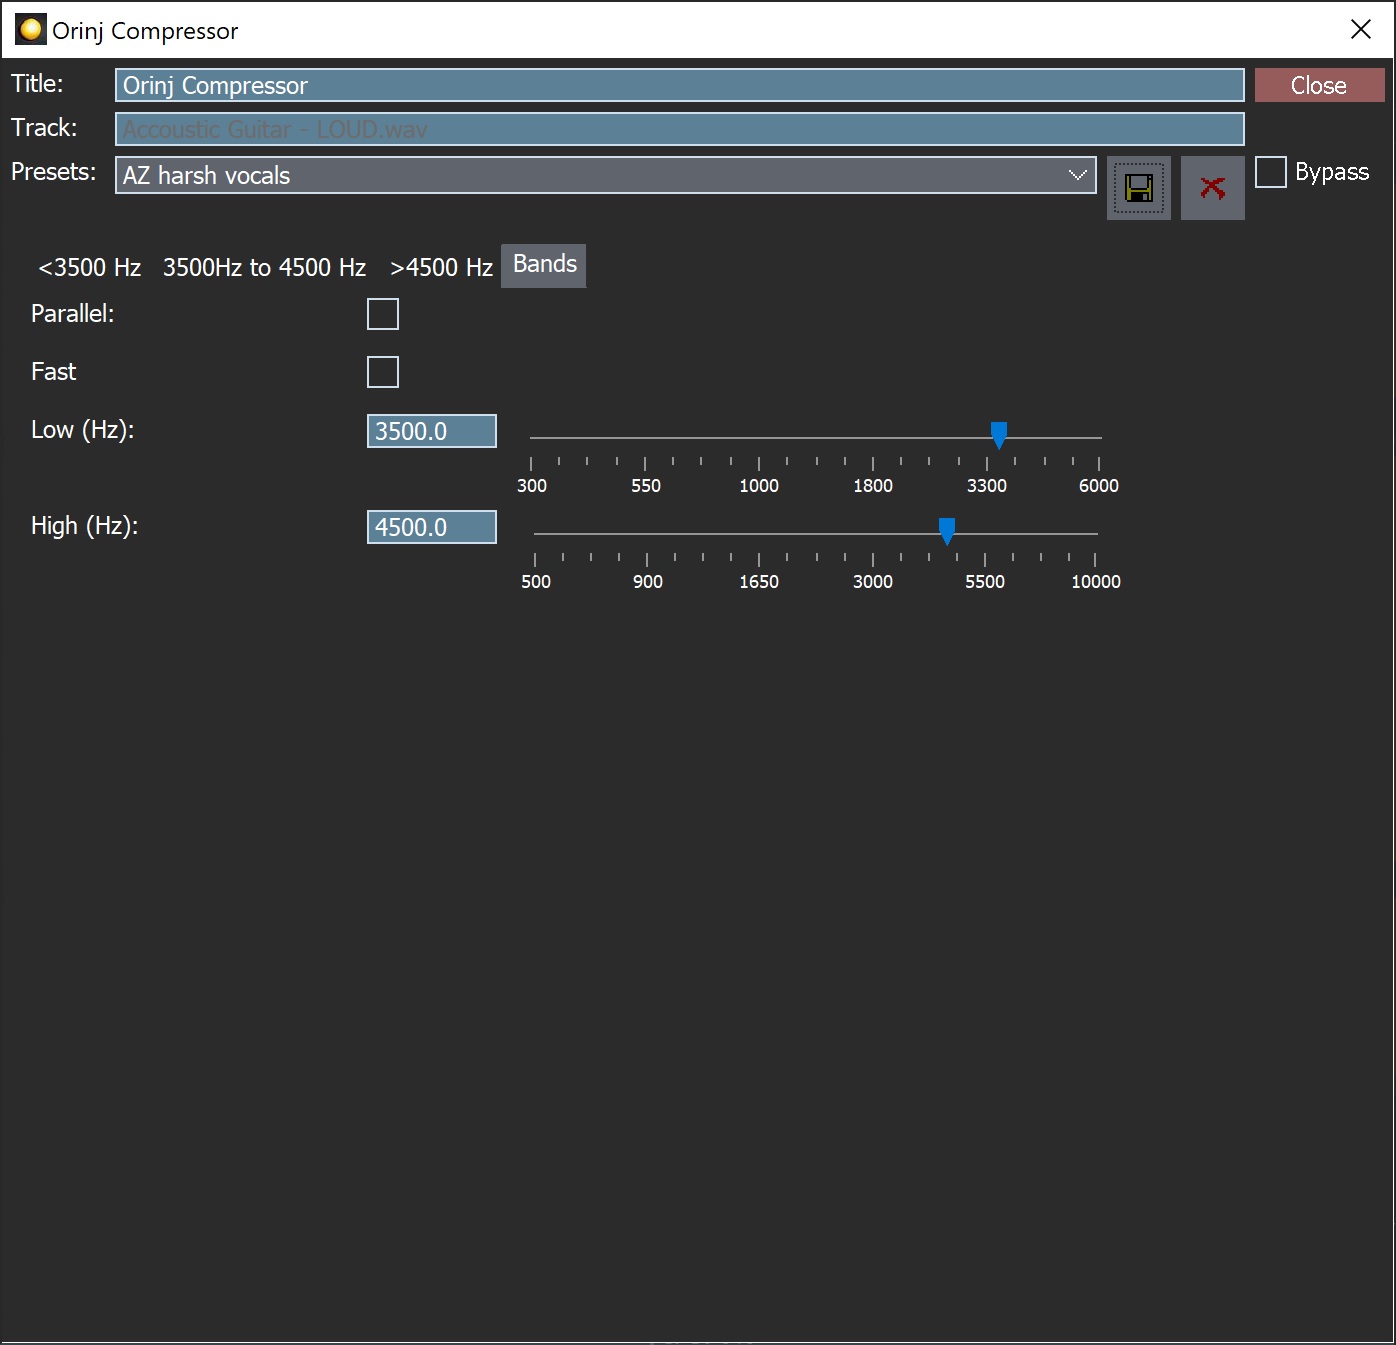
The controls on this tab are as follows.
- Parallel: Use this check box to make this a parallel compressor. A parallel compressor adds the original signal to the processed signal. While this reduces compression, it preserves some of the characteristics of the original signal.
- Fast: Use this checkbox to change the type of filters that the compressor uses when separating the three frequency bands. When the box is checked, the compressor will deploy faster filters with a nonlinear phase response. When unchecked, the compressor deploys filters that are slower but have a linear phase response.
- Low: Use these controls – the box and the slider – to set where the first band stops and the second band starts. This frequency is measured in Hz and can be between 300 Hz and 6000 Hz.
- High: Use these controls – the box and the slider – to set where the second band stops and the third band starts. This frequency is measured in Hz and can be between 500 Hz and 10000 Hz.
See Orinj Effects for additional notes on: where Orinj effects can be used, using boxes and sliders that impact the same parameter (such as the box and slider for the compressor attack), applying effects to mono and stereo waves, and using effects during playback. See Orinj Working with effects for additional information on creating, modifying, moving, and removing effects. See Compressor (of dynamics) for additional information on the compressors in audio processing.
Automations
The Orinj Compressor offers the following automations.
- Attack: This automation adds or subtracts up to 200 ms from the attack in the corresponding band.
- Release: This automation adds or subtracts up to 2000 ms from the release in the corresponding band.
- Input: This automation adds or subtracts up to 20 dB from the gain of the input signal in the corresponding band.
- Output: This automation adds or subtracts up to 20 dB from the gain of the output signal in the corresponding band.
- Low cutoff frequency: This automation adds or subtracts up to 6 kHz from the cutoff frequency between the low band and the mid band.
- High cutoff frequency: This automation adds or subtracts up to 10 kHz from the cutoff frequency between the mid band and the high band.
Right-click on the corresponding controls to add or remove automations.
Add new comment