Orinj version 9.0.0
Effects in the Orinj installation
The Orinj installation comes with the following effects.
Delay
Bass chorus
Bouncing echo
Chorus
Delay
Echo
Flanger
Multitap delay
Phaser
Reverb
Dynamics
Aural exciter
Compressor
Distortion
Gain
Limiter
Noise gate
Side chained compressor
Simple compressor
Equalization
Graphic equalizer
Parametric equalizer
Simple equalizer
Wah wah
Filtering
Band pass filter
Band stop filter
Convolution
High pass filter
Low pass filter
Notch filter
Notch filter 2
Shelving filter
Other
DC Removal
Dither
Phase oscilloscope
Pitch shift
Spectrum monitor
Vibrato and tremolo
These effects can be used in tracks in the session, on waves in the wave view, on auxiliary channels in the session, and on the master channel in the session.
Using Orinj effects
To see all digital signal processing effects in Orinj, click on the Effect menu in the session or the wave view and scroll through the menus.
To add an effect to a track or auxiliary channel in the session or a wave in the wave view, click on the corresponding menu. For example, to add the Orinj Delay, click on Effect, then Delay, and then Orinj Delay.
See Orinj Working with effects or Orinj Working with auxiliary channels and the master channel if you want to add effects to the master channel in the session.
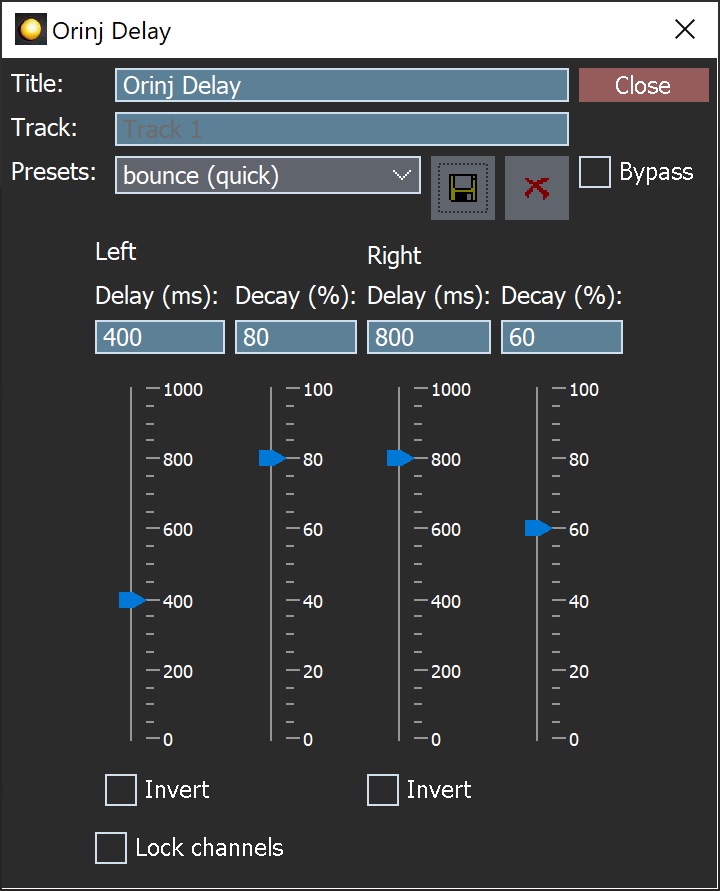
When you add an effect, you will see a window with parameters for the effect. The following example is the window for the Orinj Delay.
Common effect controls
Some controls are the same for all Orinj effects.
- Title: The title helps you remember what effects were added and for what purpose. Type any title or leave the title as it is.
- Track: Each effect dialog shows the title of the track to which this effect was added.
- Presets: Most effects allow you to select from predefined sets of control values. You do not have to use presets, but they may give you ideas about the effect.
- Use the drop-down box to select a preset. The preset selected in the delay dialog above, for example, is the "quick bounce" preset
- You can change controls after the preset is selected. If you select the preset again, the controls will return to what the preset specifies.
- Use the Save button to save the current values of controls as a preset. You will be able to use this preset every time you open a window for this type of effect.
- Use the Delete button to delete presets. You can delete both presets that are part of the Orinj installation and presets that you may have created. Once a preset is deleted, it cannot be used again.
- Presets that are part of the Orinj installation are in the "presets" folder of the installation. Presets created by the user are saved in the ".orinj/presets" folder in your operating system user folder.
- Bypass: Click on the bypass checkbox to bypass the effect. If this box is checked, the effect will not be used in your mix but will remain in the track or wave to which you added it.
- Lock channels: This checkbox exists in some effects – effects that handle left and right channel audio data separately. Click on this checkbox to make sure that the left channel and right channel always have the same values for all effect parameters. When you check this box, the right channel will be changed to match the left channel. If this box is checked, when you change the controls in one channel, the other channel will change automatically to match.
Using boxes and sliders
Many Orinj controls use a box and a slider at the same time for the same value. For example, both the box and slider for the left channel delay in the example dialog above control the left channel delay amount – the difference in time between the original signal and the delayed signal in the left channel. As you change the value of one of these controls, the other one will change automatically. The slider is usually easier to use, but the box allows you to specify more precise values. Use the one with which you feel most comfortable.
Effects on mono and stereo waves
When working with mono waves, Orinj creates a stereo signal with two identical channels. Thus, both left and right channel controls are always used.
Using effects during playback
Effect windows are non-modal, and you can use the rest of Orinj while effect windows are open. The values of the effect parameters change playback as soon as you change the controls. You can keep the dialog open and adjust controls during playback.
Since effects may take a lot of computing power, you can premix some of the tracks (see Orinj Working with session tracks). When a track is premixed, it is mixed into a single wave file before playback. All effects will be applied before playback. You should do so for tracks that are approximately complete in terms of production and when you need more computational power. You cannot change the effects of a premixed track during playback. You can still change these effects when there is no playback. In this case, the track will automatically be mixed again.
Effect times
Every effect is equipped with a start and an end time, and the effect works only between the start and end time. By default, the effect starts at the beginning of the track, at time 00:00:000 and ends at the end of the track.
If you want to add the effect to only a portion of the track, select that portion and then add the effect.
Alternatively, add the effect and click on Effect and then on Times. You will get the following dialog.
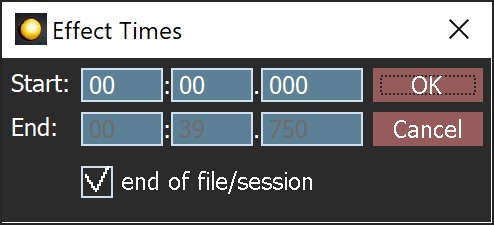
Set the beginning and end time of the effect and click OK when you are done. If you want the effect to end at the end of the session, check the end of file/session check box.
When the effect starts or ends in the middle of the wave, the effect crossfades the original signal and the output of the effect. This is done to prevent pops and clicks. At the start of the effect, the amplitude of the original signal slowly decreases and the amplitude of the processed signal increases. When the effect ends, the amplitude of the processed signal slowly decreases, and the amplitude of the original signal slowly increases.
Crossfading happens over 5 milliseconds. In the current version of Orinj, this cannot be changed by the user. This is short enough to not be noticeable, but it is always best to start and end effects where the amplitude of the signal is low (e.g., between syllables in a vocal recording), especially since many effects must introduce some (very short) delay in the processed signal.
While effects distributed with Orinj crossfade, there is no guarantee that effects developed by others with the Orinj effect framework will do so.
Effect channels
Effects can be applied to both channels (left and right) or to one of the channels.
To select the channel, to which the current effect should apply, click on Effect and then on Channel in the wave view menu. You will see the following dialog.

Select the appropriate channel and click OK.
Effect automations
Most continuous controls in the effects in the Orinj installation can be automated. The Orinj Delay shown above for example allows automating the left channel delay, right channel delay, left channel decay, right channel decay, dry mix, and wet mix.
Automations allow gradual changes in the effect parameters during playback. The following picture shows an automation of the Orinj Delay wet mix. The automation adds 60 percent to the wet mix at 10 seconds into the session. The amount added to the wet mix slowly decreases after that. At 15 seconds, the automation subtracts 40 percent from the delay wet mix.

The values of all automations in Orinj are added to the effect parameters. In the example above, the value of the automation at any point in time is added to the value of the delay wet mix, whatever that value may be.
Even with the automation, the final effect parameter value cannot exceed the parameter limits. The Orinj Delay wet mix, for example, is always between 0 percent and 100 percent. If the wet mix before the automation is 50 percent and the automation adds another 60 percent, then the final value of the wet mix will be 100 percent and not 110 percent.
To add or remove an automation, right click on the corresponding control. To add or remove the wet mix automation in the Orinj Delay, for example, right click on the wet mix box or the wet mix slider in the Orinj Delay window.
It is possible to add automations to unused parameters. For example, the width parameter of the Orinj Shelving filter is unused when the filter is in its high-boost form. You can still add automation to that parameter, but the automation will not be used.
Automations in the Orinj effects are always present. When you remove an automation, the automation is deactivated. It is no longer visible or used. Its points and the resulting envelope, however, remain. If you add the automation again, you will see the same points that you created before.
Effect stacks
You can save all effects in a session track, a wave in the wave view, or a loop track in a separate file. This file can then be imported into another track or wave. This is the easiest way to copy effects from one track to another or from one wave to another. The effects will be added to the new track in the same order and with the same parameters.
To export an effect stack from the session, click on Track, Effect Stack, and then Export in the menu. To import an effect stack into the session, click on Track, Effect Stack, and then Import. The wave view menu contains similar commands.
To export or import effect stacks from an auxiliary channel, click on Track, Groups / Aux Channels, and then on Aux Channel Controls in the menu. In the auxiliary channel control dialog, use the Export and Import buttons.
To export or import effect stacks from the main session channel, click on Track and then on Master Channel in the menu. In the master channel dialog, use the Export and Import buttons.
The Orinj effect framework
Orinj effects use a strict programming framework that allows Orinj to operate with or without the effects and allows new effects to be developed and added to Orinj without modifying Orinj itself. This means that external developers can prepare their own Orinj packages with effects in addition to the effects that are included in the Orinj installation. All effects can be installed or updated separately, without modifying Orinj or its installation.
See also:
Orinj Working with effects
Add new comment